
Connect AWS DynamoDB to your Next.js App and Deploy on Vercel
In this post I'll walk you through setting up an AWS DynamoDB Database with your Next.js App and how to deploy it easily on Vercel. We're going to go over the AWS Free-Tier, different ways to configure DynamoDB and how to store the database's secret credentials safely in Next.js Framework and use them as Environment Variables. Last but not least, I'll show you how to manage Environment Variables on Vercel with either the Vercel CLI or the Dashboard on vercel.com.
Here's a short overview of steps we're going to undertake:
- Set up DynamoDB with an AWS Free-Tier Account, receive our secret Credentials and create our first No-SQL Table
- Connect the Database to our Next.js App using Environment Variables locally
- Build a REST API with Next.js Serverless Functions
- Read and Write to and from our Database using the DynamoDB DocumentClient
- Deploy our Next.js App on Vercel and feeding secret Credentials as Environment Variables
Set up AWS DynamoDB No-SQL Database
I'm using my AWS Free-Tier Account for this tutorial. If you don't have an account yet, just signup for one, here: AWS Free Tier- Free usage of AWS services for 12 months below certain limits included. Best thing for us: DynamoDB is always free for handling up to 200M requests per month! Read more about the AWS Free Tier via the link provided above.
We are going to create the Database from an IAM user inside the AWS Management Console. The IAM user can be created from your AWS root user inside the AWS Identity and Access Management dashboard (IAM). Here, you need to attach the existing IAM policy AmazonDynamoDBFullAccess to your IAM user. Do NOT set up DynamoDB from your root Account!
Login to the AWS Management Console with your newly created IAM user, head to the DynamoDB dashboard and create a table. AWS will walk you through the process. I choose posts as table name and postId as primary-key, which is a string in my case. I left everything else as default. Make sure to download and safely store our credentials in order to connect to your database, later.
Contrary to relational Databases (SQL), which store data inside rows and columns, the AWS DynamoDB Database stores our data inside items and attributes. Our new Table posts will contain an item for each post on our blog. Each item will consist of three attributes: postId, postViews, postLikes
Here is an example of what an item will look like:
{
  "Item": {
    "postId": "connect-dynamoDB-with-next-js",
    "postViews": 42,
    "postLikes": 23
  }
}
This is the json response we get back from the database.
Other ways to use DynamoDB
Apart from the AWS Management Console, there are these alternative options
- AWS CLI: Basically every input the user feeds to an AWS service boils down to a call to the AWS API. So why not call it from the AWS CLI directly?!
- aws-sdk: The AWS Software-Development-Kit for JavaScript is an npm package to integrate in your code in order to use AWS services from within your scripts. We're going to use the SDK for setting up a DB instance and use it to query our database from our Blog.
Setup a reusable DynamoDB instance in Next.js
So we're heading over to VS code and add the AWS SDK to the dependencies of our blog:
$ npm install aws-sdk
Create a new file in the root directory which will establish a reusable connection to our Database from our Serverless Functions.
$ touch db.js
db.js looks like this:
import AWS from "aws-sdk";

// Update AWS config
AWS.config.update({
  accessKeyId: , // Do NOT HARD-CODE your secret credentials here
  secretAccessKey: , // Do NOT HARD-CODE your secret credentials here
  region: "eu-central-1",
});

// Create DynamoDB service object
const db = new AWS.DynamoDB.DocumentClient({ apiVersion: "latest" });

export default db;
In order to access the credentials from db.js when running npm run dev in Next.js, we need to store these credentials inside a file which will NOT be committed to the Next.js bundle or pushed to GitHub! Next recommends .env.local to store secret Environment Variables.
DB_ACCESS_KEY_ID=ABCDEFG1234567890
DB_SECRET_ACCESS_KEY=0987654321ABCD
Now we can access these Environment Variables from db.js with process.env.
// db.js
import AWS from 'aws-sdk';

AWS.config.update({
  accessKeyId: process.env.DB_ACCESS_KEY_ID,
  secretAccessKey: process.env.DB_SECRET_ACCESS_KEY,
  region: 'eu-central-1'
});

const db = new AWS.DynamoDB.DocumentClient({ apiVersion: 'latest' });

export default db;
Note that we're using the DocumentClient which will simplify querying our Database from within our code. Additionally, its important not to use the variable names AWS provided us with: e.g AWS_ACCESS_KEY_ID and AWS_SECRET_ACCESS_KEY. These are reserved variable names on Vercel so we cannot use them.
If you want to read/write to the Database outside your Next.js App, simply from a node module, you can load the credentials from a file, e.g. config.json
// config.json
{
  "DB_ACCESS_KEY_ID": "ABCDEFG1234567890",
  "DB_SECRET_ACCESS_KEY": "0987654321ABCD",
  "region": "eu-central-1"
}
// load credentials from a node module
const AWS = require('aws-sdk');

AWS.config.loadFromPath('./config.json');
Query DynamoDB instance from Serverless Functions in Next.js
Since our Blog generates each post from a Markdown file, e. g. aws-dynamodb-next-js-vercel.md, located in /posts/, we have a page using Next's dynamic routing inside /pages/posts/[id].js. We're passing all the frontmatter and Markdown of a post to this page which then displays the content for us. We want to query our DynamoDB with the id we passed to the page under the URL blog.com/posts/aws-dynamodb-next-js-vercel. And since we're querying our Database from Next.js Serverless Functions, we want the API to receive the id to query the Database with via a query paramater.
So we create the Serverless Functions in our API inside /pages/api/posts/[id]/index.js
import db from '../../../../db';

export default async function (req, res) {
  const id = req.query.id;
  // filter API requests by method
  if (req.method === 'GET') {
    // Allow a blog post to get its number of likes and views
    const params = {
      TableName: 'posts',
      Key: {
        postId: id
      }
    };

    db.get(params, function (err, data) {
      if (err) {
        console.log('Error', err);
      } else {
        // send the json response from the callback
        res.json(data.Item);
      }
    });
  } else if (req.method === 'PUT') {
    // Allow a blog post to update its likes (via a button) or views (on rendering)
  }
}
Since we're using the DynamoDB DocumentClient we can use plain JavaScript objects in params. When making an API request to the GET route from the client side, Next.js recommends using their custom made React Hook SWR (stale-while-revalidating). Read more about SWR in the Next.js documentation - fetching data on the client side.
A short example about how I fetched data inside a React component:
// FetchFromDatabase React component to pull views and likes for a post from DB
import React from 'react';
import useSWR from 'swr';

const async fetcher = (...args) => {
  const res = await fetch(...args);
  return res.json();
}

const updatePostAttribute = async (id, attribute) => {
  const postAttribute = { attribute: attribute };

  await fetch(`/api/posts/${id}`, {
    method: "PUT",
    headers: {
      "Content-type": "application/json",
    },
    body: JSON.stringify(postAttribute),
  });
};


export default function FetchFromDatabase({ id }) {
  const { data, error } = useSWR(`/api/posts/${id}`, fetcher);
}

if (error) return <div>Failed to load DB</div>;
// if there no data yet
if (!data) {
  return (
    <>
        <span>
          - views
        </span>
        <span>
          - likes
        </span>
    </>
  )
}
if (data) {
  return (
        <>
        <button>
          {/* insert data from DB response */}
          {data.postViews} views
        </button>
        <button
          onClick={(event) => {
            {/* pass post id and attribute "postLikes" to DB query function */}
            updatePostAttribute(id, "postLikes");
          }}
        >
        {data.postLikes} likes
        </button>
      </>
  )
}
The PUT request from updatePostAttribute reaches the API route /api/posts/[id]. The PUT request handler increments the number of likes on that post corresponding to the passed [id] using anUpdateExpression and ExpressionAttributeValues.
// /pages/api/posts/[id]/index.js
if (req.method === 'PUT') {
  const attribute = req.body.attribute;

  const params = {
    TableName: 'posts',
    Key: {
      postId: id
    },
    ExpressionAttributeValues: { ':inc': 1 },
    UpdateExpression: `ADD ${attribute} :inc`
  };

  db.update(params, function (err, data) {
    if (err) {
      console.log('Error', err);
    } else {
      console.log('Success, updated.', data);
    }
  });
}
In production mode of my Blog DevDiary I have implemented additional features to disable the Button on click or immediatley counting +1 up without the need to wait for the Database response a few milliseconds. A similar solution would be to display a spinner while the number of likes is updating. But for now, I decided to go with immediate increment like this using parseInt:
import React, { useState } from 'react';
// inside function FetchFromDB
const [isClicked, setIsClicked] = useState(false);

return (
  <button>
    {!likeIsClicked ? data.postLikes : parseInt(data.postLikes, 10) + 1} likes
  </button>
);
Nevertheless, there are some drawbacks to it. I know, that - since the disabled attribute on the button vanishes on rendering - a user can reload the page and hit "like" again, so a user can like a post more than once. But disable seemed to me the most straightforward solution right now. Else, I would need user authentication or settinig a cookie on guest users to forbid multiple liking.
Deploy Next.js App to Vercel
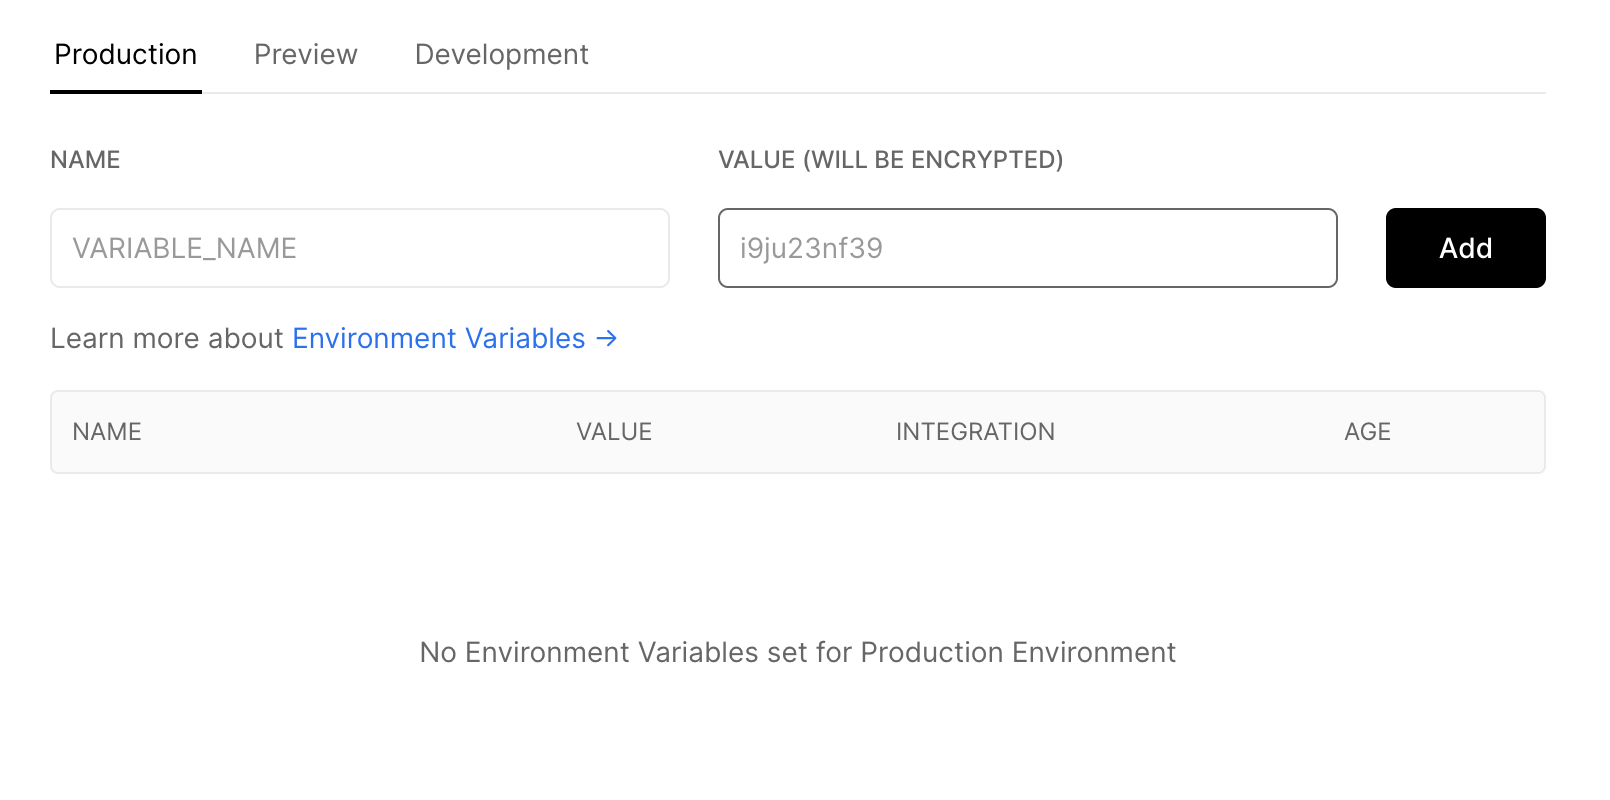
When deploying the Next.js App on Vercel we have to make sure that we provide Vercel with our secret credentials. A reference of process.env.DB_ACCESS_KEY_ID from our code will not yield a value, because .env.local - where our secret credentials are stored for local development only - is ignored by git, so its unavailable on Vercel platform. To upload our credentials to Vercel as Environment Variables we use the dashboard -> Projects -> Our Project -> Settings -> Environment Variables.
Then we push our code to our GitHub repo, Vercel takes on the build process and deployment from here.
$ git push origin master
The Vercel CLI
I found out about the Vercel CLI pretty late but now I find it pretty useful! You can manage your projects without heading over to the Vercel dashboard. Simply fire some commands from the terminal of your project.
$ npm install -g vercel # will install vercel globally
For example we could have uploaded Environment Variables via the Vercel CLI:
$ vercel secrets add DB_ACCESS_KEY_ID ABCDEFG1234567890
It seems that the Vercel CLI will simplify my workflow!
Next steps for the development of DevDiary are:
- Enhance SEO of the whole website (meta tags, sitemap, analytics)
- Enhance SEO for each single blog post (including new ones)
- Inspect the layout of a blog post shared on Twitter or WhatsApp
See you soon! ..and happy hacking! Christian